Dates, categories, fields and match length
The basic data a tournament needs before a schedule can be built: the playing days and hours, the categories and their group names, the fields, the match length used when the schedule is made, and the separate play length printed on the match card.
Looking for something else? Building the final play Moving, switching and deleting matches Play types and special play systems Ranking tables and result positions Reading and filtering the schedule Restrictions and anti-teams Running a season-long league in the Scheduler
Before a schedule can be made, TXO needs to know four things about your tournament: which days you play and between which hours, which categories are playing (and what their groups are called), which fields the matches are played on, and how long a match takes.
Match length comes in two separate flavours, and they are set in different places: the match length used when the schedule is built, and the play length printed on the match card.
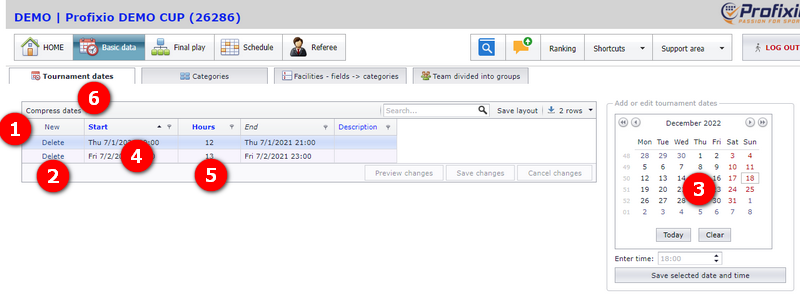
A tournament date is one playing day with a start time and an end time.
You do not need to be exact about the start and end times for a date. Set start and end to your maximum values: if your tournament starts 09:45, just enter 09:00 as start time.
Tournament dates can also be changed on your registration site, and the changes are imported into TXO.
The column "Description" is only for your own sake. It is not shown any place else.
In the tournament date window:
- Press the button "New" to make a new tournament date.
- Use the delete button to remove a date. It is not possible to delete dates which have matches — delete the matches first, then the date.
- Fastest way to add a new date: click on a date in the calendar, enter the time and then click the button "Save selected date and time". The new tournament date shows up in the grid.
- Click into the date cell to change date and/or time.
- Enter the number of hours for each day. The column "End" is calculated from "Hours".
- Each tournament date can be compressed so that it covers only as much of the day as the matches need — see "Deleting and compressing dates".
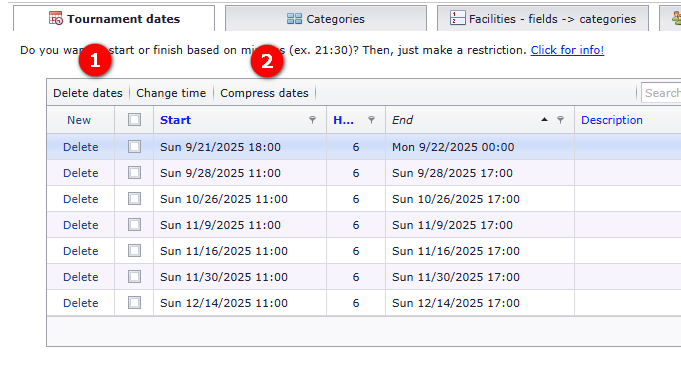
Two buttons tidy up the date list once matches exist:
- "Delete dates" deletes all dates without matches. Use it if you have made way too many dates.
- "Compress dates" deletes the dates without matches and in addition shortens the dates that do have matches, to be as short as possible. If a date is set from 10:00 to 23:00 but has matches only from 14:00 to 18:00, its start and end time are set to 13:00 and 19:00 — one hour earlier and one hour later than the matches span.
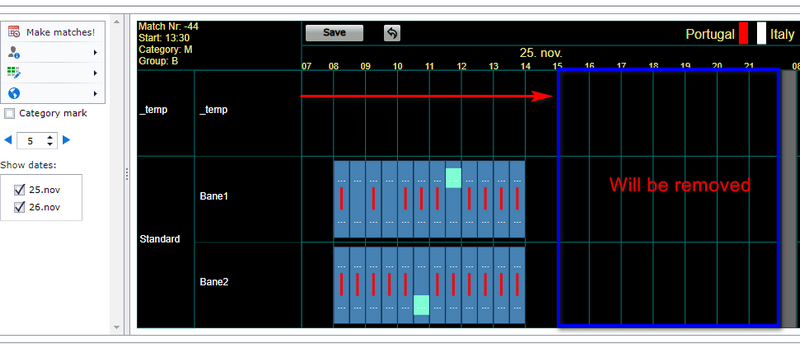
A single tournament date can be compressed the same way, so it shows only enough of the day, based on the matches. If the first match starts at 13:00, compressing edits the tournament date to start from 12:00. If no matches exist on a tournament date, that date is set inactive.
Example: 25 Nov will be changed to end at 15:00 after compress.
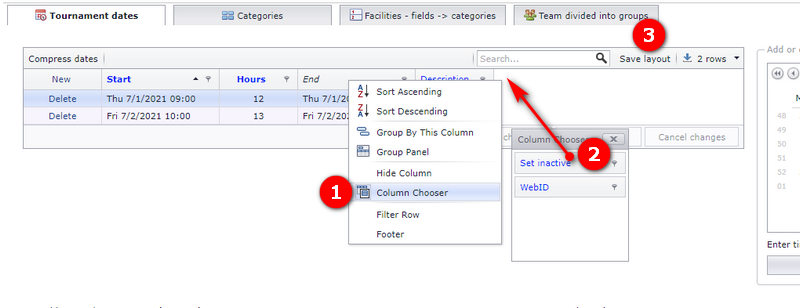
A tournament date can be set inactive. Use this mainly if you are unsure whether the date shall be used at all — otherwise we recommend deleting unused dates.
Inactive dates do not show up, and the computation is smoother for long and heavy tournaments. This is used for tournaments with more than 10 dates and more than 1000 matches.
The "Set inactive" column is not in the grid to begin with:
- Right click on a column header.
- Drag the column "Set inactive" up to the header area.
- In order to keep the change for later, click "Save layout".
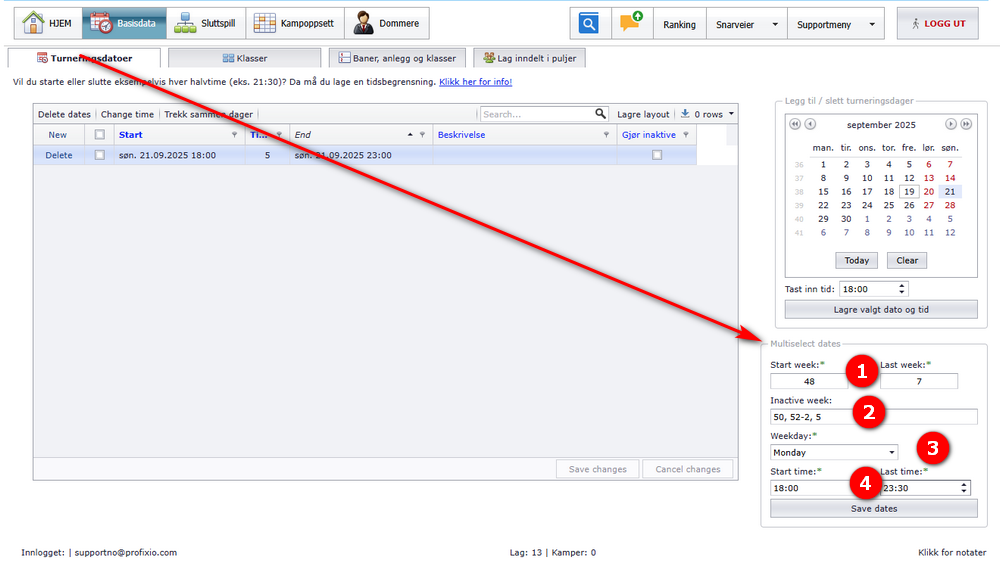
A tournament spanning several weeks, with matches each Tuesday from 18:00 to 23:00, is easily made from "Multiselect dates". "Multiselect dates" is shown for tournaments where the last date minus the start date is bigger than 21.
- Enter start week and last week number. The match dates include both the start and the last week number. It is no problem if the weeks are passing new year.
- Enter inactive weeks. Use comma (,) to separate, and a line (-) to include all inactive weeks between. For example "45, 48, 51-3, 11": none of weeks 45, 48, 51, 52, 53, 1, 2, 3, 11 will be included.
- Enter the specific day for each week. You need to do this twice if you want to include two days (or more).
- Enter start and end time for each date, and then click Save.
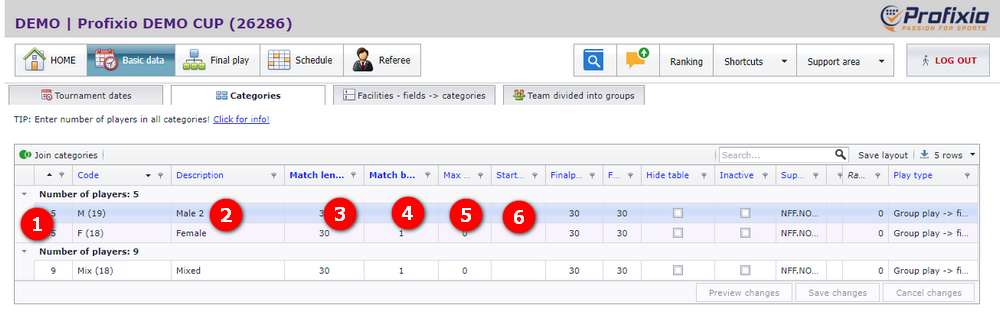
A category's "Name" is taken from your tournament admin site and is not changed in TXO. You can change its "Description" here.
Match length and match break are two very important values — be sure you set those values correct.
In the category window:
- To make things simpler, enter the number of players for each category. Later it is easy to assign the corresponding fields to the categories, and grouping is more effective. The number does not need to mirror the real number of players — you decide the number.
- "Description" is fetched from your admin site, but can be changed here. The admin site will be changed after publishing the match schedule.
- Match length could better be called "Slot length", because it is the length of the match plus the break between this match and the next one (field break). So if a team plays 2x8 minutes and you want 4 minutes of break to the next match, the match length is 20 minutes.
- Match break is the number of matches each team shall wait before they can play their next match. Often the value is set to 1, so each team has to wait at least one match after they have played a match.
- "Max number of days each team can play": set this to 1 if all teams in the category shall only play 1 day group play. Playoff is not considered here.
- If there are class playoff games, you can decide when the playoffs start in "Start final play time". The group play then has to be completed by this time — this also applies to categories without playoff. The value is optional.
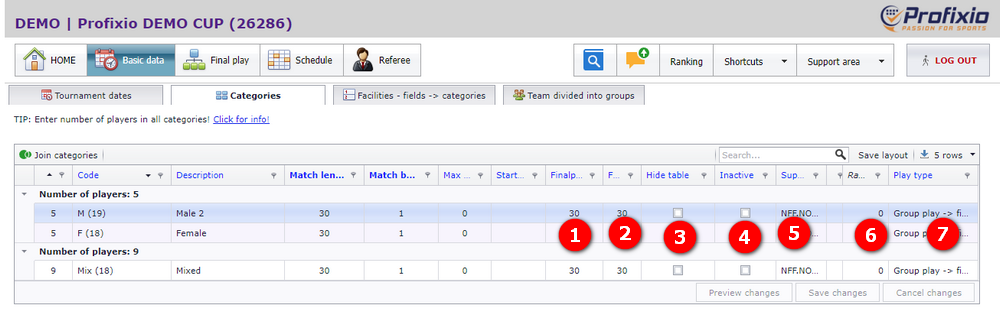
The category window has a second set of columns, for the details:
| Setting | What it does |
|---|---|
| "Playoff length" | The same as match length, but for playoff matches. It applies in categories that have playoff matches. |
| "Sort order" | The order the categories are shown on the public web. |
| The column for hiding the table | Turns off the table on the web for classes that are too young for a table. By default, TXO follows your federation's rules for tables in younger classes; your federation or district administrator can tell you which ages they cover. |
| Inactive | Set a class as inactive if the class is not to be displayed. |
| "Superior" | The name of the sport federation for this sport in this country. It helps to set some default parameters for this category. |
| Joined category | Classes can be merged if a class has too few players. This column shows the joined category name — see "Joining two categories". |
| "Playtype" | The play system for the category, for example direct cup play with no group play. The play types have their own page. |
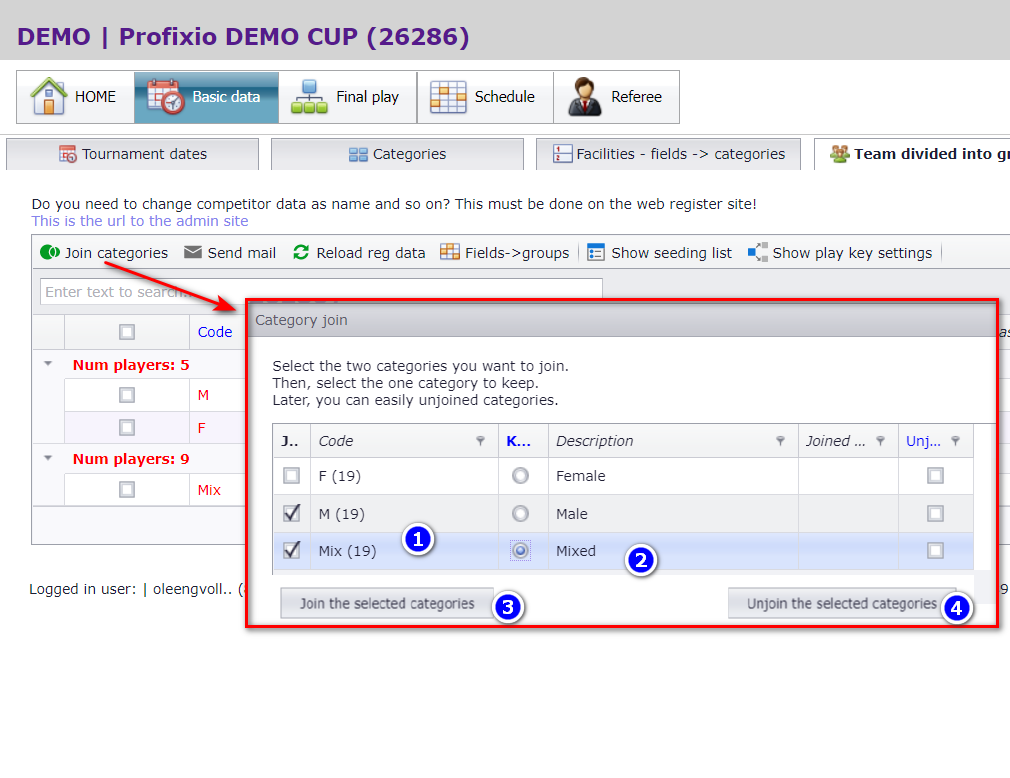
Two categories can be joined into one, which is what you do when a class has too few players.
- Select two categories which shall be joined.
- Select the category which shall take over. Often it is the oldest players which shall be kept. The category which is not kept will be set as inactive.
- Click the button to join the categories.
- If you should change your mind, click the button to split (unjoin) the categories again.
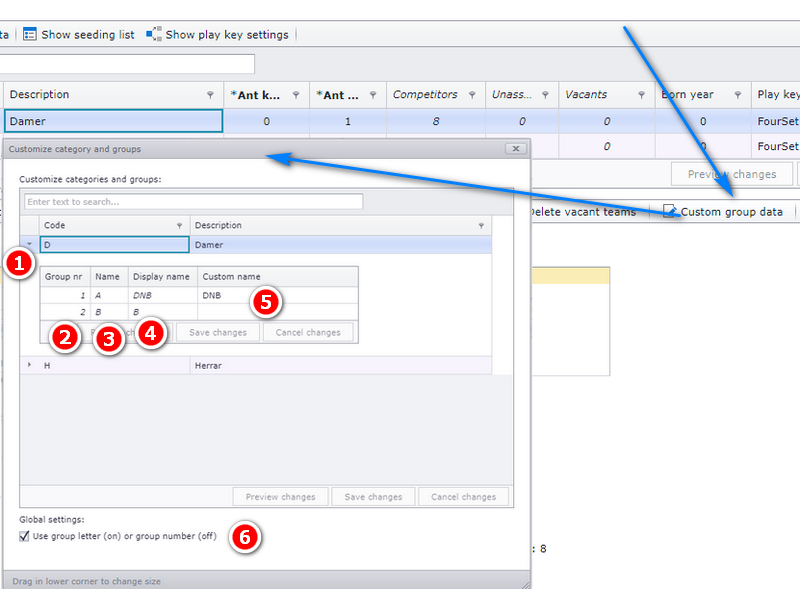
As default, groups will get the letter as the group name: group number 1 will be named A, and so on. The group name can be changed to just a number, or to a custom name — a sponsor name or whatever you want.
Enter menu "Basic data" and then the tab "Teams divided into groups". Select a category and enter button "Custom group data".
- Expand the category row to show the groups.
- Group number is read-only and is the technical number of the group.
- Group name is read-only and shows the letter of the technical number.
- Display name is how the group name will show up, based on your choices.
- Custom name can be changed by you, to whatever name. This will override all other settings, and must be set as empty if you want to use only number or letter.
- Here you can choose to use number or letter for groups. This will influence all groups in the whole tournament. Custom name must be empty, or the custom name will override all other settings.
Each category must have at least one field assigned. If not, no matches can be automatic positioned for this category.
If you have one big field, but you want to divide it into several small fields, you must make all this small fields.
We recommend to use correct facility name for each field. Use the panel in the bottom of the field window to make your facilities.
Fields are default assigned to categories, but you can assign fields to groups instead — see "Assigning fields to groups".
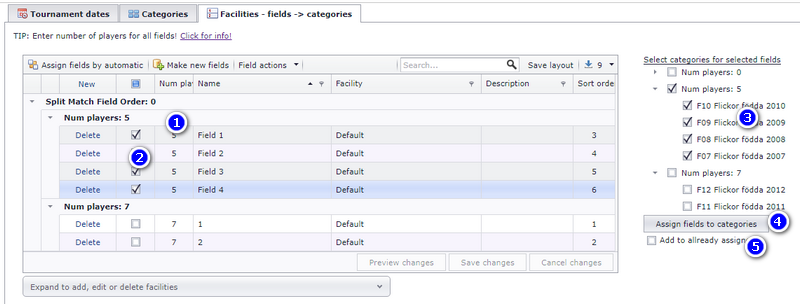
- First of all, enter the number of players for each field. You will then get the fields much more view friendly.
- Select the fields you want to assign a category.
- Select the category (or categories) — the number of fields is shown between parenthesis.
- Click "Assign fields to categories" to save this assignment.
- Check on this box if you want to add fields to already assigned categories.
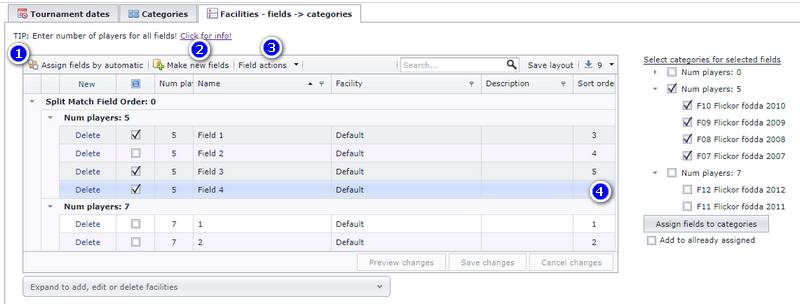
- If you have categories set with number of players, and fields also set with number of players, you can assign fields to categories by automatic.
- If you have to make several fields, use this button. If you enter "Field" and want 7, TXO will make Field 1, Field 2 … Field 7. If you enter "Field 5" and want 4, TXO will make Field 5, Field 6, Field 7 and Field 8.
- If you want to "tidy up" the fields, you can delete fields which are not in use. Look into this menu.
- Sort order influences in what order the categories will show up in the public match schedule.
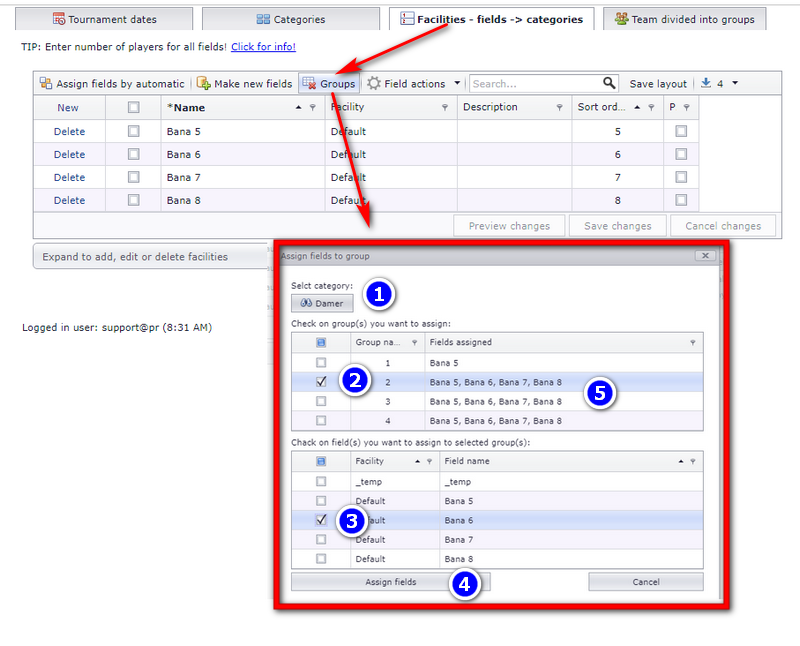
It is also possible to assign fields to groups, not only to categories. Most often you will still want to assign fields to category. Enter menu "Basic" and then:
- Click on the category you want to work with.
- Select one or several groups (just check them on).
- Select one or several fields you want to assign to the selected group(s).
- Click on the button "Save" and continue with several groups if you want.
- The last column shows the fields assigned to the group.
Match length can be changed for all matches in a category, or for just selected matches.
Be aware that collisions can be made when changing match length. Often you must do some manual moving of matches afterwards, and after changing match length you can compress the matches.
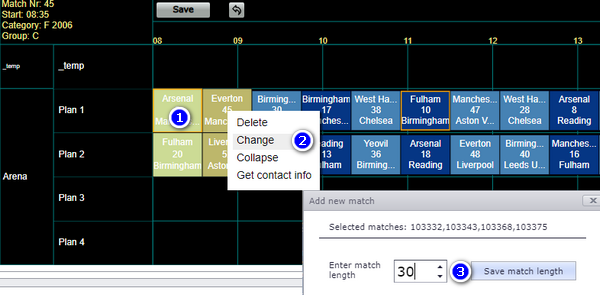
To change match length on selected matches (one or several):
- Click on the match (CTRL+click if you want to select several) and then right click on one of them.
- Select "Change" from the right click menu.
- Enter new match length and click "Save match length".
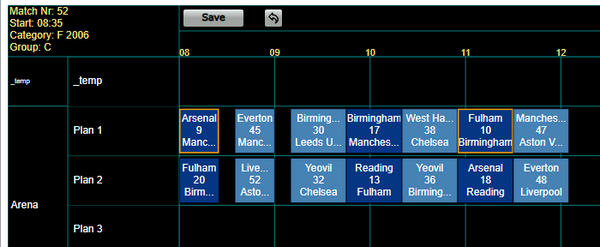
The selected matches have then got a new match length:
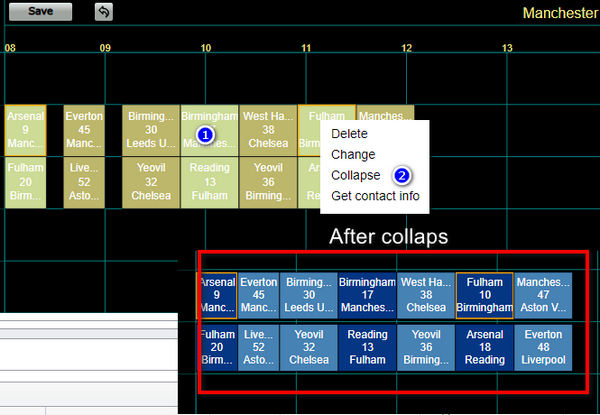
- Choose matches which shall be collapsed (or expanded, if the new match length is longer). Tip: you can choose a bunch of matches by pressing the SHIFT key and using your mouse to drag a rectangle over the matches.
- Select "Collapse".
- After the collapse, all matches are now moved nearby each other.
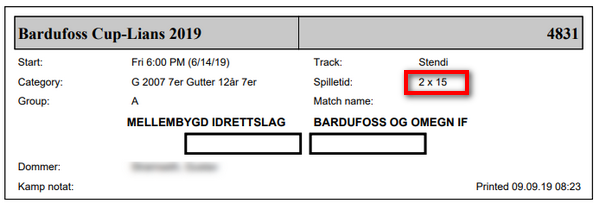
Match play length on the match card has nothing to do with match length in the schedule. Match play length do ONLY show up on match card.
Match play time data includes number of periods, period length and period break. For example, 2x15 (5) means 2 periods, 15 min period length and 5 min period break. You can change the match play time data whenever you want.
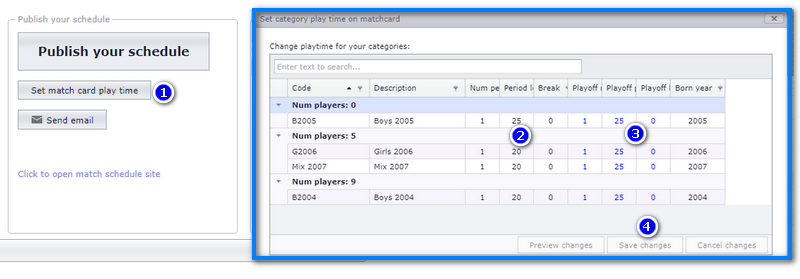
Match play length will show up like this:
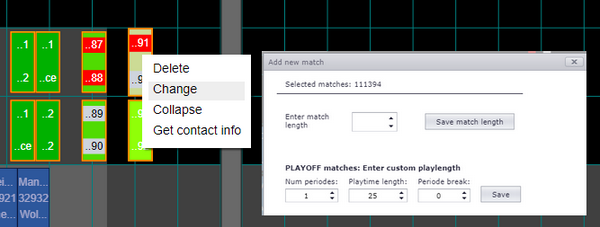
Group play matches take the play length of the whole category. Single playoff matches can be given their own play length — typically an end final match is longer.
The match card can be printed from the same window as you register results.
- Click on the button "Set match card play time" as shown.
- Play time data for group play are shown in these columns.
- Play time data for playoff are shown in these columns.
- Remember to click "Save changes". When saved, all match play data is updated.
- Right click on a playoff match and select "Change".
- Enter data in the bottom of the popup ("Num periods:" and so on).
- Remember to click "Save".
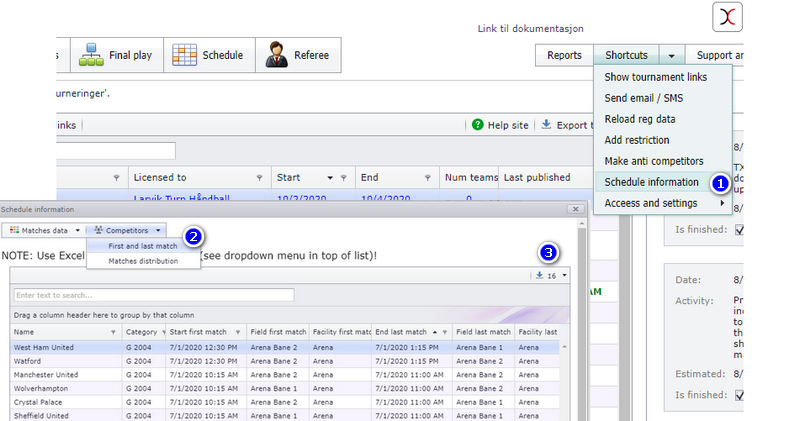
The "Schedule info" window includes a lot of data from your schedule. You can list first and last match for each team, number of matches on each field and many more. Use the menu to see the possibilities.
- Select "Schedule info" for the window.
- Select the data you want from this menu.
- You can export data to Excel by clicking on this arrow.
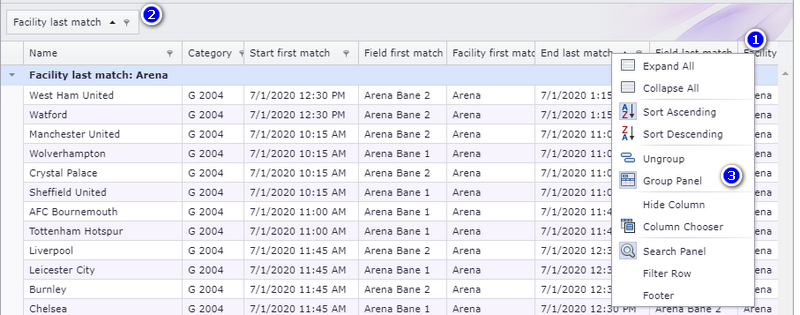
To easier get the wanted data, you can filter, sort or group data.
- Right click on a column header.
- If you select to group, the column header will show up here.
- As you can see, there are a lot of functions on the right click menu.
If you run TXO with a Norwegian interface, the buttons and columns on this page are labelled like this:
| English | Norwegian |
|---|---|
| "New" | «Ny» |
| "Save selected date and time" | «Lagre valgt dato og tidspunkt» |
| "Hours" / "End" | «Timer» / «Slutt» |
| "Description" | «Beskrivelse» |
| "Set inactive" | «Angi inaktiv» |
| "Save layout" | «Lagre layout» |
| "Multiselect dates" | "Flervalgsdatoer" |
| "Delete dates" / "Compress dates" | «Slett datoer» / "Komprimer datoer" |
| "Basic data" menu | «Basisdata» |
| "Teams divided into groups" tab | «Lag delt inn i puljer» |
| "Custom group data" | «Endre navn på puljer» |
| Group number / Group name / Display name / Custom name | "Puljenr" / "Navn" / Visningsnavn / "Tilpasset navn" |
| "Schedule info" | «Planleggingsinformasjon» |
| "Change" (right click menu) | «Endre» |
| "Save match length" | «Lagre kamplengde» |
| "Collapse" | «Skjul» |
| "Set match card play time" | «Angi spilletid for kampkortet» |
| "Save changes" / "Save" | «Lagre endringer» / «Lagre» |
| "Num periods:" | "Antall perioder:" |
Neighbouring TXO pages take over where this one stops:
- Getting the categories, clubs and teams into TXO in the first place: "Loading registration data from the web".
- The teams themselves, including vacant teams: "Teams, clubs and vacant teams".
- Which team ends up in which group, and seeding: "Dividing teams into groups and seeding".
- Keeping two teams apart, or away from a time slot: "Restrictions and anti-teams".
- Play systems, and the direct cup play referred to by the "Playtype" column: "Playtypes and special play systems".
- Building the finals: "Building the final play".
- Actually generating the matches once the basic data is in place: "Making the schedule".
- Moving, switching and deleting individual matches: "Moving, switching and deleting matches".
- Reading and filtering the finished schedule: "Reading and filtering the schedule".
- Tables and result positions: "Ranking tables and result positions".
- Settings that only apply in certain sports or federations: "Sport and federation specific setups".
- Season-long leagues rather than weekend tournaments: "Running a season long league in TXO".
See also
Was this page helpful?