What the Scheduler is, and signing in
Signing into Profixio and starting TXO, who gets access to a tournament, what the startup window shows, and the order to work in when you build a tournament schedule from zero.
Profixio TXO is the match scheduling system for tournaments. You use it after your tournament has been created and teams have registered on the Profixio website: the Scheduler is where you set dates, categories and fields, divide teams into groups, build final play, set restrictions and generate and publish the match schedule.
If you have never used Profixio TXO before, there are a few steps to go through the first time. This page covers signing in, getting access to a tournament, what you see in the startup window, and the order to work in when you build a tournament schedule from zero.
The one and only web address (URL) you need is https://www.profixio.com/app.
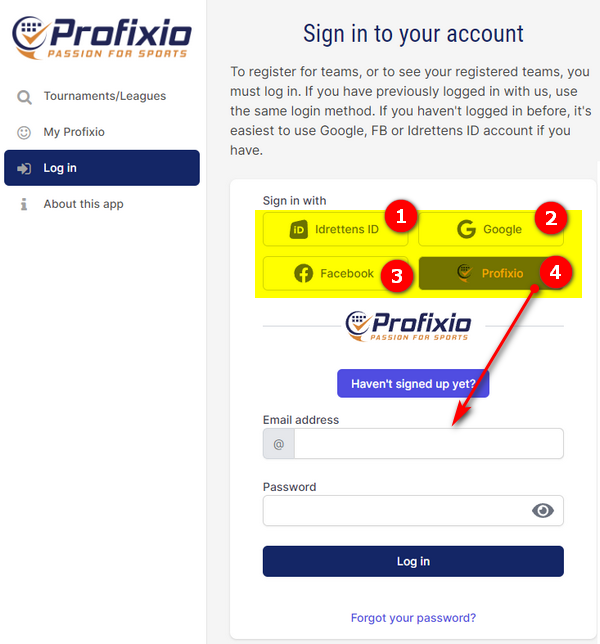
First, you must log into Profixio. This can be done in different ways; just choose the simplest for you.
- Norwegian users: "Idrettens ID". Use the same e-mail and password as when you log into Idrettens ID.
- If you are already logged into Google, you go straight into Profixio.
- The same with Facebook.
- If none of the above fits you, make an account within Profixio.
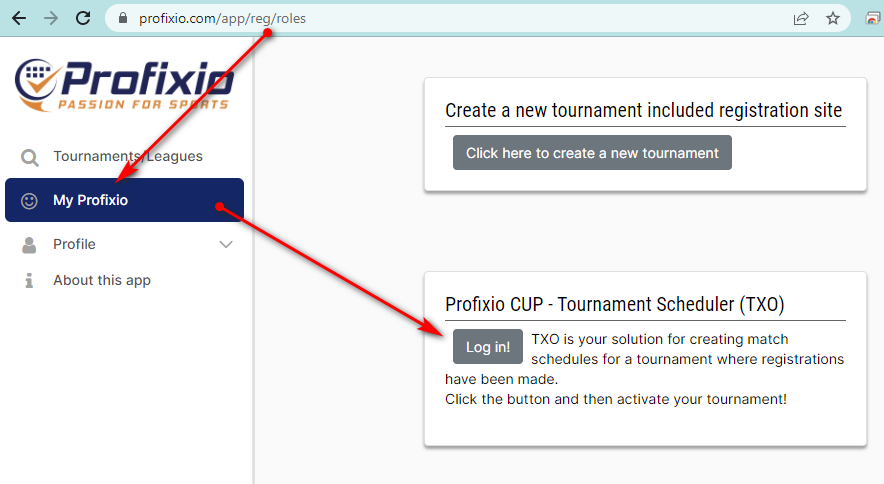
After you have logged in, start Profixio TXO from "My Profixio" as shown here.
There are two different ways a person can get access to a tournament.
- The licence holder has access to the tournaments registered on that licence. A licence is most often owned by a club.
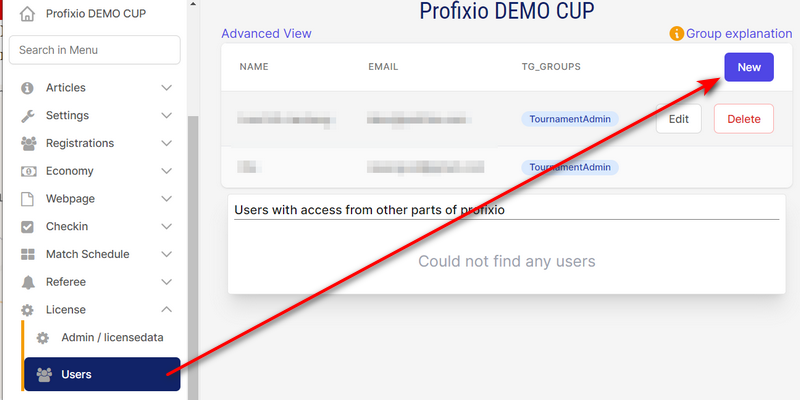
- The person's e-mail address can be entered in the Scheduler under the menu "License" - "Users".
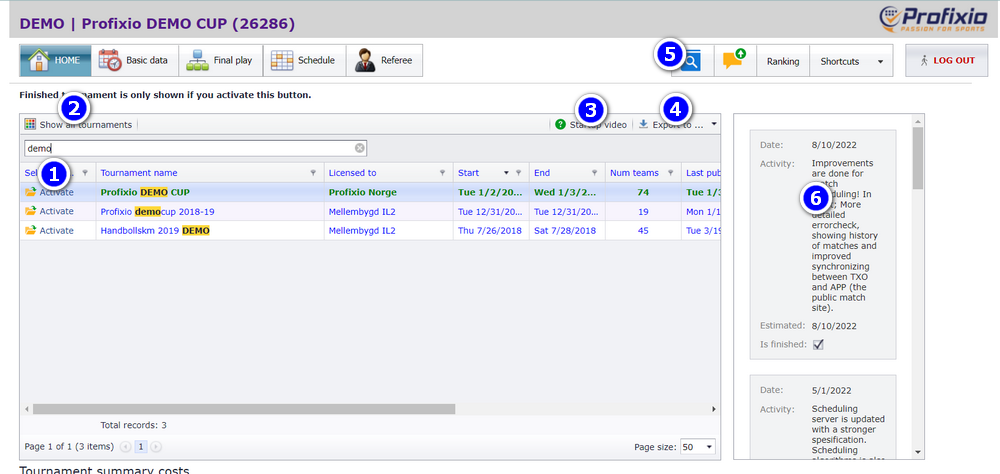
The startup window is the first page you see in the Scheduler. The most important things to know:
- All the tournaments you have access to show up in this first page.
- To remove a tournament from the list, log in as administrator at www.profixio.com/reg and make the tournament inactive there.
- New tournaments are created on the site www.profixio.com/app.
- Registration data is entered on the main admin site. We recommend letting the team leaders make their own changes.
- You have access to all your tournament links from this window: open the panel at the bottom of the window and click on a tournament.
The numbered areas in the screenshot:
- All tournaments you have access to are listed in this grid. Activate the correct one.
- Only upcoming tournaments are shown in the grid. Click "Show all tournaments" to show all historical tournaments as well.
- Watch this video to get started. It shows the basics.
- As for all grids of this type, you can export the data to both PDF and Excel.
- Complete documentation is found on the help site.
- This area shows important messages from those who develop the system.
If you have never used Profixio TXO before, go through these steps in order. Tip: we really recommend the video walkthrough of a simple one-day tournament, described in the next section.
- Log into TXO by clicking the log-in button.
- After you have logged in, activate your tournament by clicking the activate button.
- Enter basic data. Basic data in TXO is divided into four tabs, and you must go through each tab. If you wonder about something, click on the blue doc button.
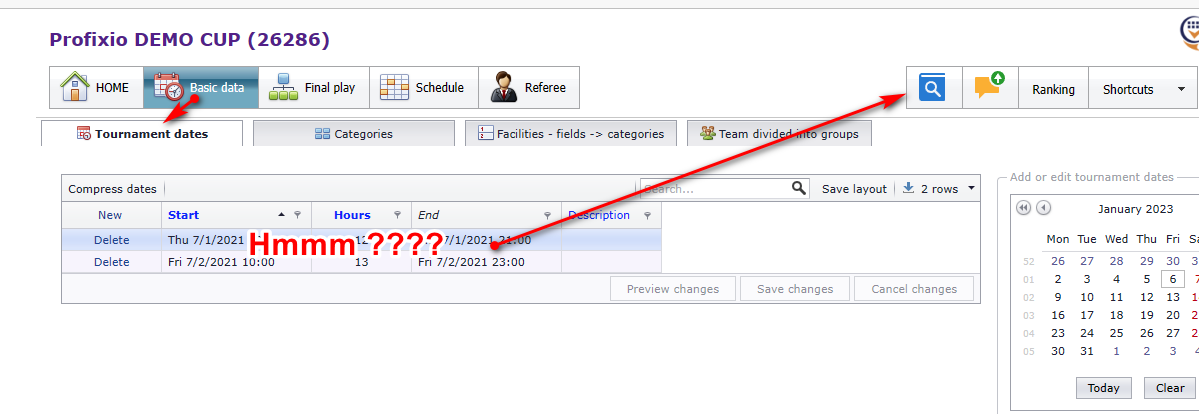
This is the transcript of the getting-started video, translated to English. It shows how a match schedule is made for a simple cup played over one day, where some teams cannot play before 12:00 because of travel, some teams must not meet each other, and one category has an A and a B final play, each starting at the semi-finals.
- Activate the cup. Once you have logged in, activate the cup.
- Tournament days and times. Change the tournament days and times by clicking into the cells and editing them. Remember to save your changes afterwards; this applies in every window with tables of this kind.
- Category data. Set the data for the categories. We recommend entering the number of players for each category: the categories are then grouped, which makes it easier to change other data later. Enter the match length and the number of matches' break a team must have before its next match. Note that the match length includes the break until the next match, which we call the field break ("banepause"). Because one category has final play, enter the data for the final play too.
- Fields. Assign which fields can be used for each category. Enter your fields and the number of players each field is meant for. When all fields are entered, assign fields to categories. You can add more venues here.
- Divide teams into groups. Click on a category and choose how many teams you want in each group. You can select several categories at a time to save time. To move a team from one group to another, drag the team over and drop it on the orange top row. To swap two teams, drop the team on top of the team you want to swap with. Finally, set the number of matches each team plays: if you leave 1 in the column "Antall serier" (number of series), everyone plays everyone once.
- Final play. Add an A and a B final play: an A final play between teams 1 to 4 and a B final play between teams 5 to 8. Create both final plays at once. When you close the window you see the A final play; switch between viewing the A and B final play in the same window. To include the B final in the A final play, drag its box in and place it under the final box. Finally, save.
- Restrictions. Go to the schedule menu. First add a time restriction for a team that cannot play before 12:00: choose the team, the day and the time. A red line shows when the team cannot play. Save the restriction. Also select the teams that are to be anti-teams; these are kept from playing at the same time.
- Make the schedule. Click the button to make the schedule and select the groups you want to schedule. Confirm your selection. Click make schedule, and after a few seconds you see the matches placed in the graphical visualiser. Click a box (a match) to see where the home team and the away team play. If you are not happy with a match's placement, drag it to the position you want.
- Publish. When you are happy with the schedule, publish the matches to the public schedule page.
There are many areas this walkthrough does not go into, so use the other Scheduler help pages actively.
- Getting registered teams, categories and clubs into the Scheduler: see Loading registration data from the web.
- Giving another person access to a tournament from the "License" menu: see Giving access to new users.
- The full set of getting-started videos: see Video walkthroughs.
- The detailed pages for each step in the walkthrough: Dates, categories, fields and match length, Dividing teams into groups and seeding, Building the final play, Restrictions and anti-teams, Making the schedule, Moving, switching and deleting matches and Publishing messages and reports.
- Compact schedules where each team has only one match's break between its matches ("Komprimert kampoppsett"), and when such a schedule is impossible: see Making the schedule.
- Asking Profixio to build the schedule for you: see Ordering a schedule or support.
See also
- Building the final play
- Dates, categories, fields and match length
- Dividing teams into groups and seeding
- Loading registration data from the web
- Making the schedule
- Moving, switching and deleting matches
- Ordering a schedule or support
- Publishing the schedule, e-mail and SMS
- Restrictions and anti-teams
- Video walkthroughs
- Giving access to new users
Was this page helpful?